
b l o g . . .
angelica... and how to candy it
by Jilly - 15:20 on 21 January 2021
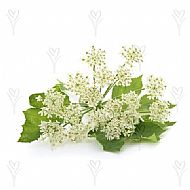
A tall architectural plant with gorgeous flowers and numerous uses; both culinary, it is a natural sweetener, and medicinal. The seed heads also dry fantastically well. Not suitable for window boxes or planters, but if you have the space, it is most definitely worth adding to your herb garden. Shop Angelica Seeds
Apparently candied Angelica, once a dead-cert resident in the home baking aisle of every supermarket, is now rather hard to come by! Upon hearing this worrying news, we knew exactly how to rectify this potentially national disaster... candy your own home-grown angelica of course! What is more, I knew precicely where to find precicely how to do it!... Esme Gray Booker's book, Sweets that have Temped Me, published in 1959. There, nestled amongst the recipes for treacle toffees, marshmallows and rum truffles, are notes, infact a whole chapter, dedicated to this "fascinating branch of sugar work"!


It is by no means a quick and simple process, but I'm sure would very rewarding should you find yourself in desperate need of candied angelica and have several consecutive days with not much else on! We have updated the measurements from imperial to metric, other than that, these are Esme's recommendations and recipe...
How to Candy Angelica
- Angelica stalks must be candied immediately after cutting in early spring when they are green, crisp and tender. Trim off all roots and leaves until only hollow stems remain. Soak these in a mild brine (10g salt to 2.5 litres boiling water) for 10 mins, rinse well in cold water, then boil for 8 minutes in fresh boiled water. Cool, scrape off the outer skin and rinse again under running water.
- Place the prepared fruit in sufficient very light cold syrup (1 heaped tablespoon sugar to 1 litre water) to cover it. Bring gently to the boil, lift the pan from the head and put the lid on closely. Let the fruit steep in the hot liquid for 4 minutes. Remove the fruit, drain well and weigh. Allow the syrup to cool, then pour it over the fruit, allowing it to stand overnight. Be sure all the fruit is totally immersed. A saucer will hold it down.
- Drain the fruit and measure the quantity of syrup. You want half a litre of syrup per 500g of drained fruit, so adjust accordingly and add 50g of sugar (again, adjust to suit the quantity of drained angelica you have). Heat gently to dissolve the sugar and then bring to the boil and pour over the fruit. Cover and leave for 24 hours. Esme calls this day 1.
- On day 2, drain the fruit, add 100g pure glucose, bring to the boil and pour over the fruit. Cover and and leave again for 24 hours.
- On day 3, drain the fruit again and add 50g sugar to the syrup. Heat gently to dissolve, bring to the boil and pour over the fruit, covering and leaving for a further 24 hours.
- Repeat steps 4. and 5. adding glucose day on 4, sugar day on 5, followed by glucose again on day 6. The syrup will thicken day by day.
- On the 7th day, drain off the syrup and place the fruit on a wire rack. Heat the oven to 50 degrees C, and dry for half an hour, turn and repeat until the fruit is sufficiently dry and does not stick to the fingers - the dry surface must be uniform with no moist patches. Drying can also be carried out in direct sunlight but remember it must be possible for air to circulate around the fruit.
- Store in dark-glass jars.
hello@thegreenseedcompany.com | 0844 357 5734 | copyright © 2020 the green seed company | all rights reserved ![]()
![]()
![]() blog
blog